How to Allow Pop Ups on Mac: A Complete User-Friendly Guide
Allow Pop Ups on mac Pop-up windows often get a bad rap—and for good reason. In the early days of the internet, they were mostly associated with annoying ads or shady websites. But in today’s world, pop-ups can actually be super helpful, especially when it comes to online banking, logging into websites, downloading files, or accessing specific tools and menus. So, if you’re using a Mac and wondering how to allow pop ups, you’re in the right place.
Allow Pop Ups on mac Let’s walk you through everything you need to know—from why you’d even want to enable pop-ups, to how to turn them on in Safari, Chrome, and Firefox on your Mac.
Why Would You Want to Allow Pop Ups on Mac?
Not All Pop-Ups Are Created Equal
Allow Pop Ups on mac First off, let’s bust a myth: not all pop-ups are evil. Allow Pop Ups on mac In fact, a lot of reputable websites rely on them for essential functions. Whether it’s your bank needing to verify a transaction or a school site requiring a login page to open in a new window, Allow Pop Ups on mac pop-ups often play a legit role.
Productivity and Functionality
Allow Pop Ups on mac Some tools, especially web-based software platforms like CRM tools, time trackers, or customer support systems, use pop-ups for alerts or secondary options. If these are blocked, you might miss important messages or lose access to critical functions without even realizing it.
Education and Learning Platforms
Allow Pop Ups on mac Online learning platforms like Coursera, Khan Academy, or university portals often use pop-ups to display course materials, quizzes, Allow Pop Ups on mac or supplemental documents. Disabling pop-ups could mean missing out on key educational content.
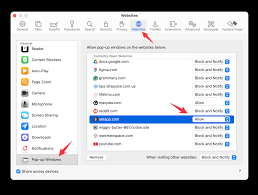
How to Allow Pop Ups in Safari on Mac
Allow Pop Ups on mac Safari is the default browser for macOS and has a pretty tight grip on blocking pop-ups. Luckily, it gives you full control to allow them—either for all websites or just specific ones.
Step-by-Step: Enabling Pop-Ups for All Websites
- Open Safari and click on “Safari” in the top menu bar.
- Choose “Settings” or “Preferences” (depending on your macOS version).
- Click on the Websites tab.
- From the sidebar, find and select Pop-up Windows.
- On the right-hand side, you’ll see a dropdown menu labeled “When visiting other websites.”
- Change the setting from Block and Notify to Allow.
Allow Pop Ups on mac This will permit pop-ups across all websites you visit. But remember, you’ll also be allowing the bad ones. So, it’s a bit of a trade-off.
Enabling Pop-Ups for Specific Websites Only
Let’s say you trust your bank’s site, Allow Pop Ups on mac but not random internet pages. Here’s how to allow pop-ups only where you want:
- Open the site you trust (e.g., your online bank).
- Then go to Safari > Settings > Websites > Pop-up Windows.
- The site you’re on will appear in the list. From the dropdown next to it, select Allow.
Now, only that website can open pop-ups. Others will still be blocked.
Quick Tip: Safari Notification Bar
Safari sometimes lets you know when a pop-up was blocked via a small banner under the address bar. You can click it to allow the pop-up temporarily without changing your full settings. Handy for one-time uses!
How to Allow Pop Ups in Google Chrome on Mac
Chrome tends to be a bit more user-friendly when it comes to adjusting pop-up settings. Here’s how to tweak it.
Enabling Pop-Ups Globally in Chrome
- Open Chrome and click the three dots (⋮) in the top-right corner.
- Select Settings.
- Scroll down and click Privacy and security.
- Choose Site Settings, then scroll to Pop-ups and redirects.
- Change the default setting to Sites can send pop-ups and use redirects.
Now all sites can show pop-ups, but again—tread carefully. Use this option if you’re sure about the sites you regularly visit.
Allowing Pop-Ups for Specific Sites Only
More often than not, you’ll want to limit which sites are allowed to use pop-ups.
- Repeat the same path: Chrome > Settings > Privacy and security > Site Settings > Pop-ups and redirects.
- Under the Customized behaviors section, find “Allowed to send pop-ups and use redirects.”
- Click Add and type in the specific URL you want to allow.
Boom! That site will now function without Chrome blocking necessary pop-ups.
Chrome’s On-the-Spot Pop-Up Alerts
When Chrome blocks a pop-up, a little icon appears in the far-right side of the address bar. Click it and you can choose to allow pop-ups from that site going forward.
How to Allow Pop Ups in Firefox on Mac
Firefox has a similar method, but its pop-up management is slightly hidden compared to Chrome and Safari. Still, it’s totally doable.
Enabling All Pop-Ups in Firefox
- Launch Firefox and click the three horizontal lines (☰) in the top-right corner.
- Select Settings.
- Choose Privacy & Security from the left sidebar.
- Scroll down to the Permissions section.
- You’ll see Block pop-up windows—uncheck that box to allow all pop-ups.
This global setting might not be the best if you browse around sketchy websites often, so proceed with caution.
Allowing Pop-Ups for Specific Sites in Firefox
If you want to allow pop-ups for just a few trusted websites:
- Click Settings… next to the “Block pop-up windows” checkbox.
- In the window that opens, click Allow and enter the website’s address.
- Click Save Changes.
This method strikes a perfect balance between safety and functionality.
What If Pop-Ups Still Don’t Work?
Sometimes, even after adjusting your browser settings, pop-ups still won’t appear. Here’s what to look out for:
Third-Party Extensions or Ad Blockers
Browser extensions—especially ad blockers or privacy tools like uBlock Origin or Ghostery—might be the culprits. Try disabling these extensions temporarily and test again.
System Security Software
Some security tools or anti-virus software might have settings that prevent pop-ups system-wide. If you’re using anything like Norton, McAfee, or even macOS’s built-in Screen Time settings, it’s worth checking those too.
Check for Redirects
Pop-ups often come through redirects. If you’re blocking redirects or cookies, that could be another reason the pop-up isn’t going through. Make sure to check your browser’s privacy settings and allow essential cookies.
Should You Be Allowing Pop-Ups All the Time?
The Risk vs. Reward Debate
Yes, pop-ups can be useful—but they can also be a gateway for scams, phishing, and spam. If you enable them globally, you’re also opening the door to more aggressive adware and unwanted redirects.
Play It Safe with Trusted Sites
Your best bet is to only allow pop-ups on specific, trusted websites. That way, you still get access to necessary content or tools, but without opening your browser to a flood of junk.
Regularly Review Settings
It’s a good idea to check your browser settings once in a while and audit which websites are on your “Allowed” list. Sometimes sites can sneak in when you’re not paying attention.
Final Thoughts
Knowing how to allow pop ups on Mac can save you from a lot of unnecessary headaches—especially when you’re dealing with banking sites, e-learning portals, or secure logins. Whether you’re using Safari, Chrome, or Firefox, the steps are pretty simple once you know where to look.
Just remember: use this power wisely. Allowing pop-ups everywhere is like leaving your front door open just because you’re expecting one friend. Stick to allowing them on trusted sites, and you’ll enjoy a much smoother—and safer—browsing experience.